Hey there! Thanks for checking out my blog. If you have a problem relevant to Cloudflare Workers or Node.js and are looking for a developer. Please do reach out to me on [email protected] or through the chat option below
Abstract
In Q2 of 2022, a beauty brand from Germany faced a problem that required proxying a certain path to another domain. They used Cloudflare for their web sites and approached me to solve this problem through various services that Cloudflare Provides. This is the case study of the solution that I built for them using various Cloudflare Services mainly including a Cloudflare Worker aided by Cloudflare WAF and Transform Rules.
The name of the brand under discussion has been hidden for privacy reasons and replaced with XYZ Brand.
The Problem
XYZ Brand had a WooCommerce based store and Wordpress blog running on the very same instance. But now, they decided to move their blog to a separate Wordpress instance. This availed them some benefits such as separating the Store Operations Team from the
Blogging Team and also reduce the traffic load on the Store Website which improved the availability.
Their blog was hosted on a specific path let’s say https://xyz.com/magazine and for SEO reasons they wanted to keep serving their blog at the same path instead of diverting users to a new domain just to visit the blog.
The Solution
Since XYZ Brand was already using Cloudflare Edge Platform for their needs, they rightfully guessed that Cloudflare and most importantly Cloudflare Workers could help address the requirements.
Building this solution required coding the worker, deploying it and fixing up any issues that happened while deployment. Here, I discuss various aspects of the solution which includes details about the code, deployment and issues faced while deploying.
In this solution xyz.com is assumed to be the client’s main domain and x.xyz.com the domain where the blog instance is hosted.
About the Code
The requirements were straightforward, and I got to work right away and coded the worker, details of its code are discussed further.
For this project, a multi-file code base was coded in TypeScript and bundled using Rollup Module Bundler. Generally, I prefer against a single file Cloudflare Worker codebase since it takes away the benefits that come with TypeScript type system and modularity. This ensures a robust codebase.
Even for small workers, the investment can pay off by reducing the debugging time and risk of deploying the worker. Since Cloudflare only lets single worker intercept a route, having a modular codebase improves extensibility of the worker as well and reduces the time it takes to extends the functionality.
The Cloudflare Worker is modeled after the well-known Service Worker Web APIs with intuitive APIs and constructs for proxying use case such as the one at hand. In fact, Cloudflare has been the one to popularize the usage of Web APIs beyond the browser, evident from JavaScript + TypeScript runtimes such as Bun and Deno adopting a similar approach.
This simplicity makes achieving the solution possible with just a few lines of code as shown in the code below. The availability of Web APIs in such as Request and URL in the Cloudflare Workers platform was helpful in achieving this simplicity without any third-party modules.
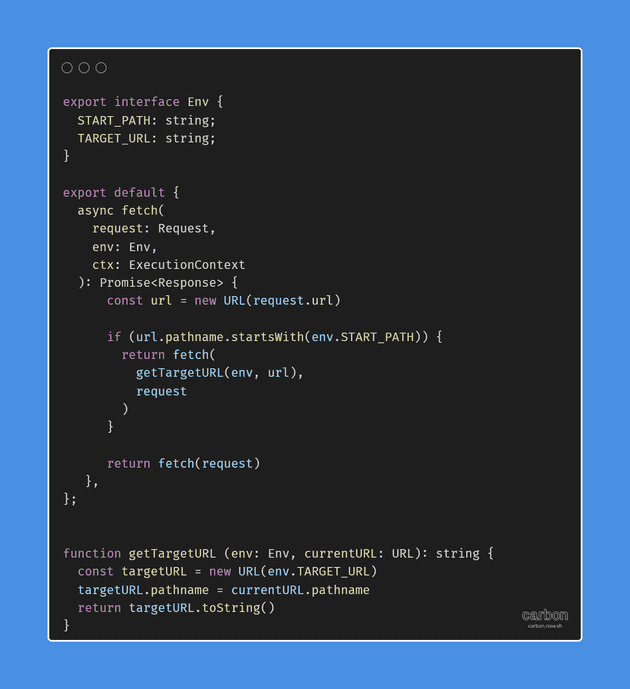
The code above achieves the following tasks
- Checks whether the URL’s path starts with a certain path
- If yes it rewrites to a different origin by changing the hostname
- Otherwise, the request is passed as-is to the original server
The starting path pattern on which the URLs need to be rewritten and intercepted is made configurable by adding it as an environment variable. This lets the client in this case XYZ Brand change the starting path from Cloudflare Worker’s Dashboard or by modifying the related variable in Github Actions Secrets configuration to persist it as part of the deployment process.
The Deployment
After testing the code in the development, the next step was to deploy the code in the production.
It isn’t possible to push the codebase as/is to limited featured Cloudflare Worker’s quick editor due to the inherent characteristics of the codebase to secure robustness and maintainability. The bundler and TypeScript compiler needs to be run at some place after all.
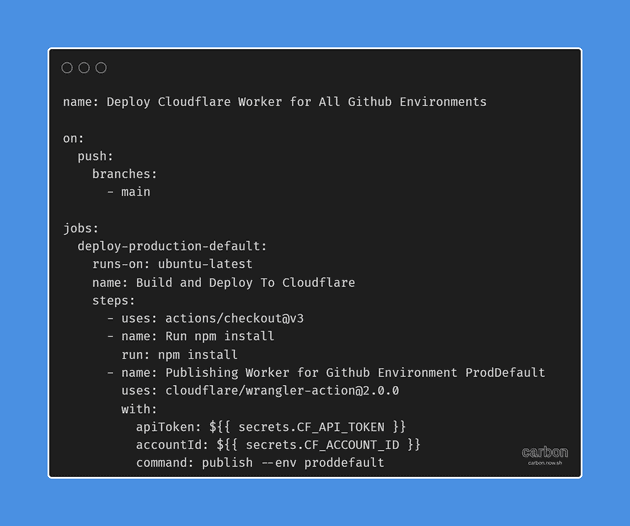
At the same time, it’s impractical to ask them to duplicate the environment on their own without providing necessary guidance. For some, it could become largely a headache when they eventually need to change a few lines of code on their own in the future. In this case, the deployments were streamlined using well known Continuous Deployment tool Github Actions with official support for Cloudflare Worker’s CLI Wrangler in form @cloudflare/wrangler-action.
A simple Github Action Workflow was able to achieve the deployment. The Workflow file was straightforward and created no additional and unnecessary jargon than needed to make the deployment possible as seen below.
Once done, the last step in the deployment process was to provide necessary information to the technical lead at XYZ Brand on how they can configure various variables such as Cloudflare API Token and Worker related variables in Github Actions. This information was provided to them in documentation and through walk through videos which I later discuss.
Fixing deployment issues
After initial deployment, we encountered two issues sequentially in production which are detailed below.
All the links on the new blog instance were absolute. Hence, rewriting the page persisted with the links that were linking the old site. This could have been solved one of two ways using Cloudflare’s own HTMLRewriter API which provides a Streaming construct to rewrite the content of the proxied resource. The other one, was to change the Wordpress Site Address so the links point to the front-facing website in the first place.
Although HTMLRewriter is a great option, it’s usage for dynamic websites can leave some loopholes. Then, there’s also issue of dynamically generated links which requires injecting some client-side javascript that can handle renaming the rest of the links not handled by HTMLRewriter. It was also noticed that some Wordpress Plugins which internally pointed to the original domain were also breaking.
Hence, it was decided to change the Site Address since this was at our disposal and was safer bet of both. Our guess turned out right and the instance rewrote all the URLs to the front facing domain as expected.
It turned out however, that changing the site address didn’t rewrite some of the resource URLs causing CORS errors. Since, by default in the absence of Access-Control-Allow-Origin header, fetch calls from x.xyz.com are disallowed from being loaded onto xyz.com. This was easily solved by adding a transform rule for HTTP Response Header Modification.
The reason for using a Transform Rule and not a worker on x.xyz.com to add the CORS header happened to be cost-related. Adding a worker for simple use case would have increased the bill far over the client’s expectations. Since, by not adding a worker on x.xyz.com, all the Sub resource requests were not intercepted the server.
For now, this works fine to keep the cost minimum. However, if the client wants to perform modifications on sub-resources directly. Only then, a worker makes sense for sub resources fetched through x.xyz.com. Graphically, this flow can be described as follows.
Using Cloudflare WAF to block original domain
The brand owner wanted to block search engine crawlers to avoid SEO issues such as double listing. However, an outright block to the domain wasn’t something they preferred to keep the debugging simple for the developers.
Here Cloudflare Web Application Firewall saved the day. Since it turns out we can configure Cloudflare’s Firewall to disallow any Known Bots. In my testing I found it effective for search engine crawlers which dominate the market, and the client was most concerned about. No robots.txt or any other modification was required to make it work.
Once again, another benefit of using Cloudflare Web Application Firewall is avoidance of incorporating a worker for use case already handled by one of their dedicated services. Cloudflare Web Application Firewall can seamlessly handle other use cases such as Blocking for all except the worker with only a little modification required for the worker. This provides benefit of configurability to the client. Documentation
While it’s important to maintain a stream of communication while building the solution. It’s equally important and a responsibility to leave the documentation in an understandable and pointed state so that any one coming after me can easily pick up on the solution that’s been built.
Hence, with the following worker I made sure that at least following items were accompanied with the repo.
- Functionality of the worker
Just to tell a little bit that what the worker does. It always helps people make sense of the repositories. I also added that developer expected for the worker to achieve.
- Configuration and Deployment Instructions
Based on the environment, instructions about configuring environment variables and deploying are also provided. This is helpful for any future developers to replicate.
They are combined into one because based on the deployment method. Methods can vary a little. Since, where possible I aim to provide both manual and automated deployment and configuration instructions.
Reach out to me!
That’s all about the project. Once deployed, no issues were encountered due to the careful considerations made during development time. If you have any questions about the case study I am happy to explain further.